
-
InstaPay WebPay
-
WebPay Integration
-
Shopping Cart Plugins
-
- Articles coming soon
-
Testing
1. Download the InstaPay WebPay plugin file for WooCommerce

2. Prerequisites to install the plugin
- To install the instaPay® WebPay gateway plugin for WooCommerce, ensure you are logged in as an Administrator on the WordPress site in question.
- Verify that WooCommerce is both installed and properly configured.
- At present, the instaPay® WebPay gateway solely supports the South African Rand (currency code: ZAR). Consequently, configure ZAR as the base currency for WooCommerce.
- For information on WooCommerce and related documentation, visit the official WooCommerce website (https://woocommerce.com).
3. How to Install and enable the Plugin
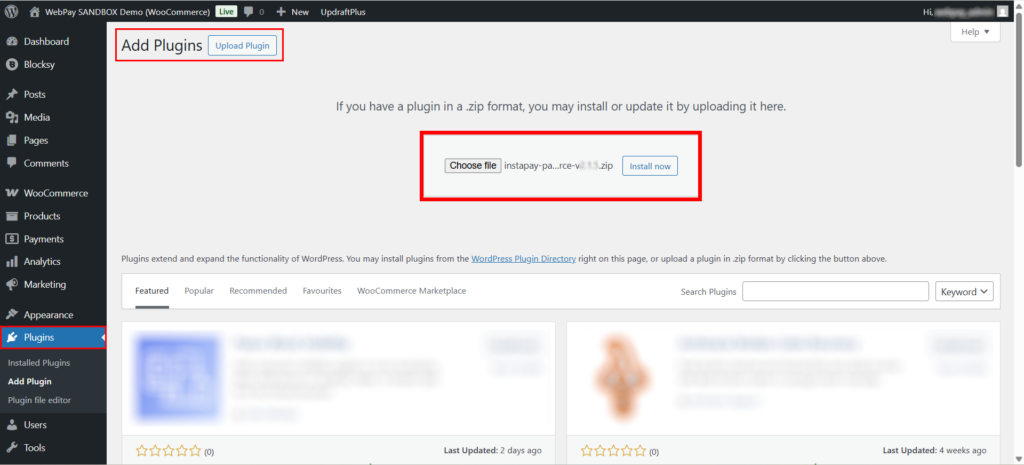
1. Select the Plugins menu option and click on the Add New button at the top of the Plugins window.
2. Click on ‘Upload Plugin’ button at the top of the Add Plugins window
3. Select ‘Choose File’ and upload the instaPay® WebPay gateway file (.zip) that you downloaded in 1 above.
4. Activate the plugin. Once activated, you might get a message stating that the plugin cannor be enabled due to missing information/settings. Select settings option.
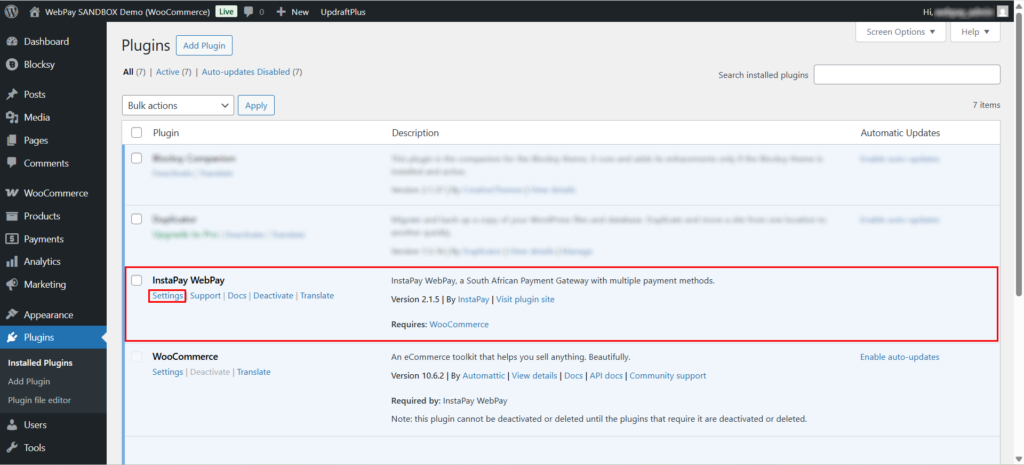
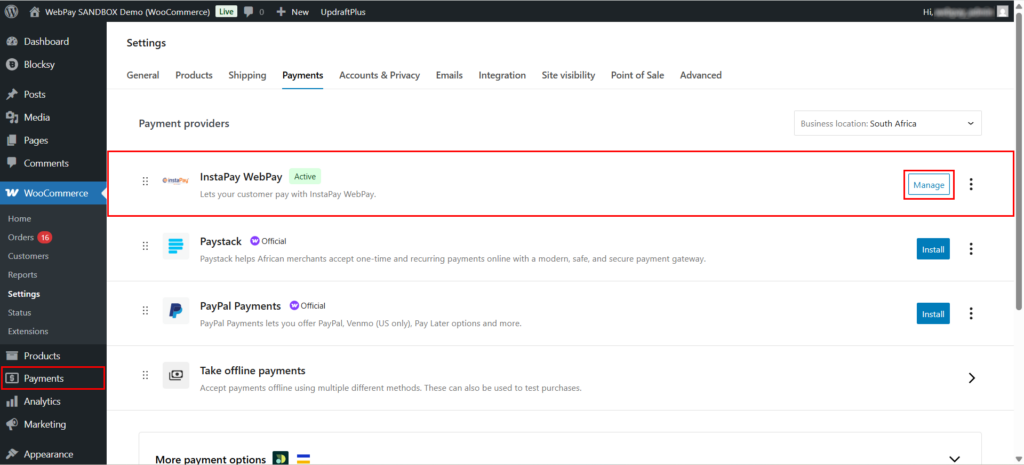
5. Open the WooCommerce menu option and select the ‘Settings’ sub-menu item or select the Payments main menu item.
6. Navigate to the ‘Payments’ tab
7. Click on the ‘Manage’ button for the instaPay® WebPay gateway plugin.
5. How to Set-Up the Plugin
The instaPay® WebPay gateway plugin is designed to offer the merchant with maximum configuration flexibility. The following screenshot provides an overview of all the configuration parameters available for setup and the table provides details of the parameter usage.
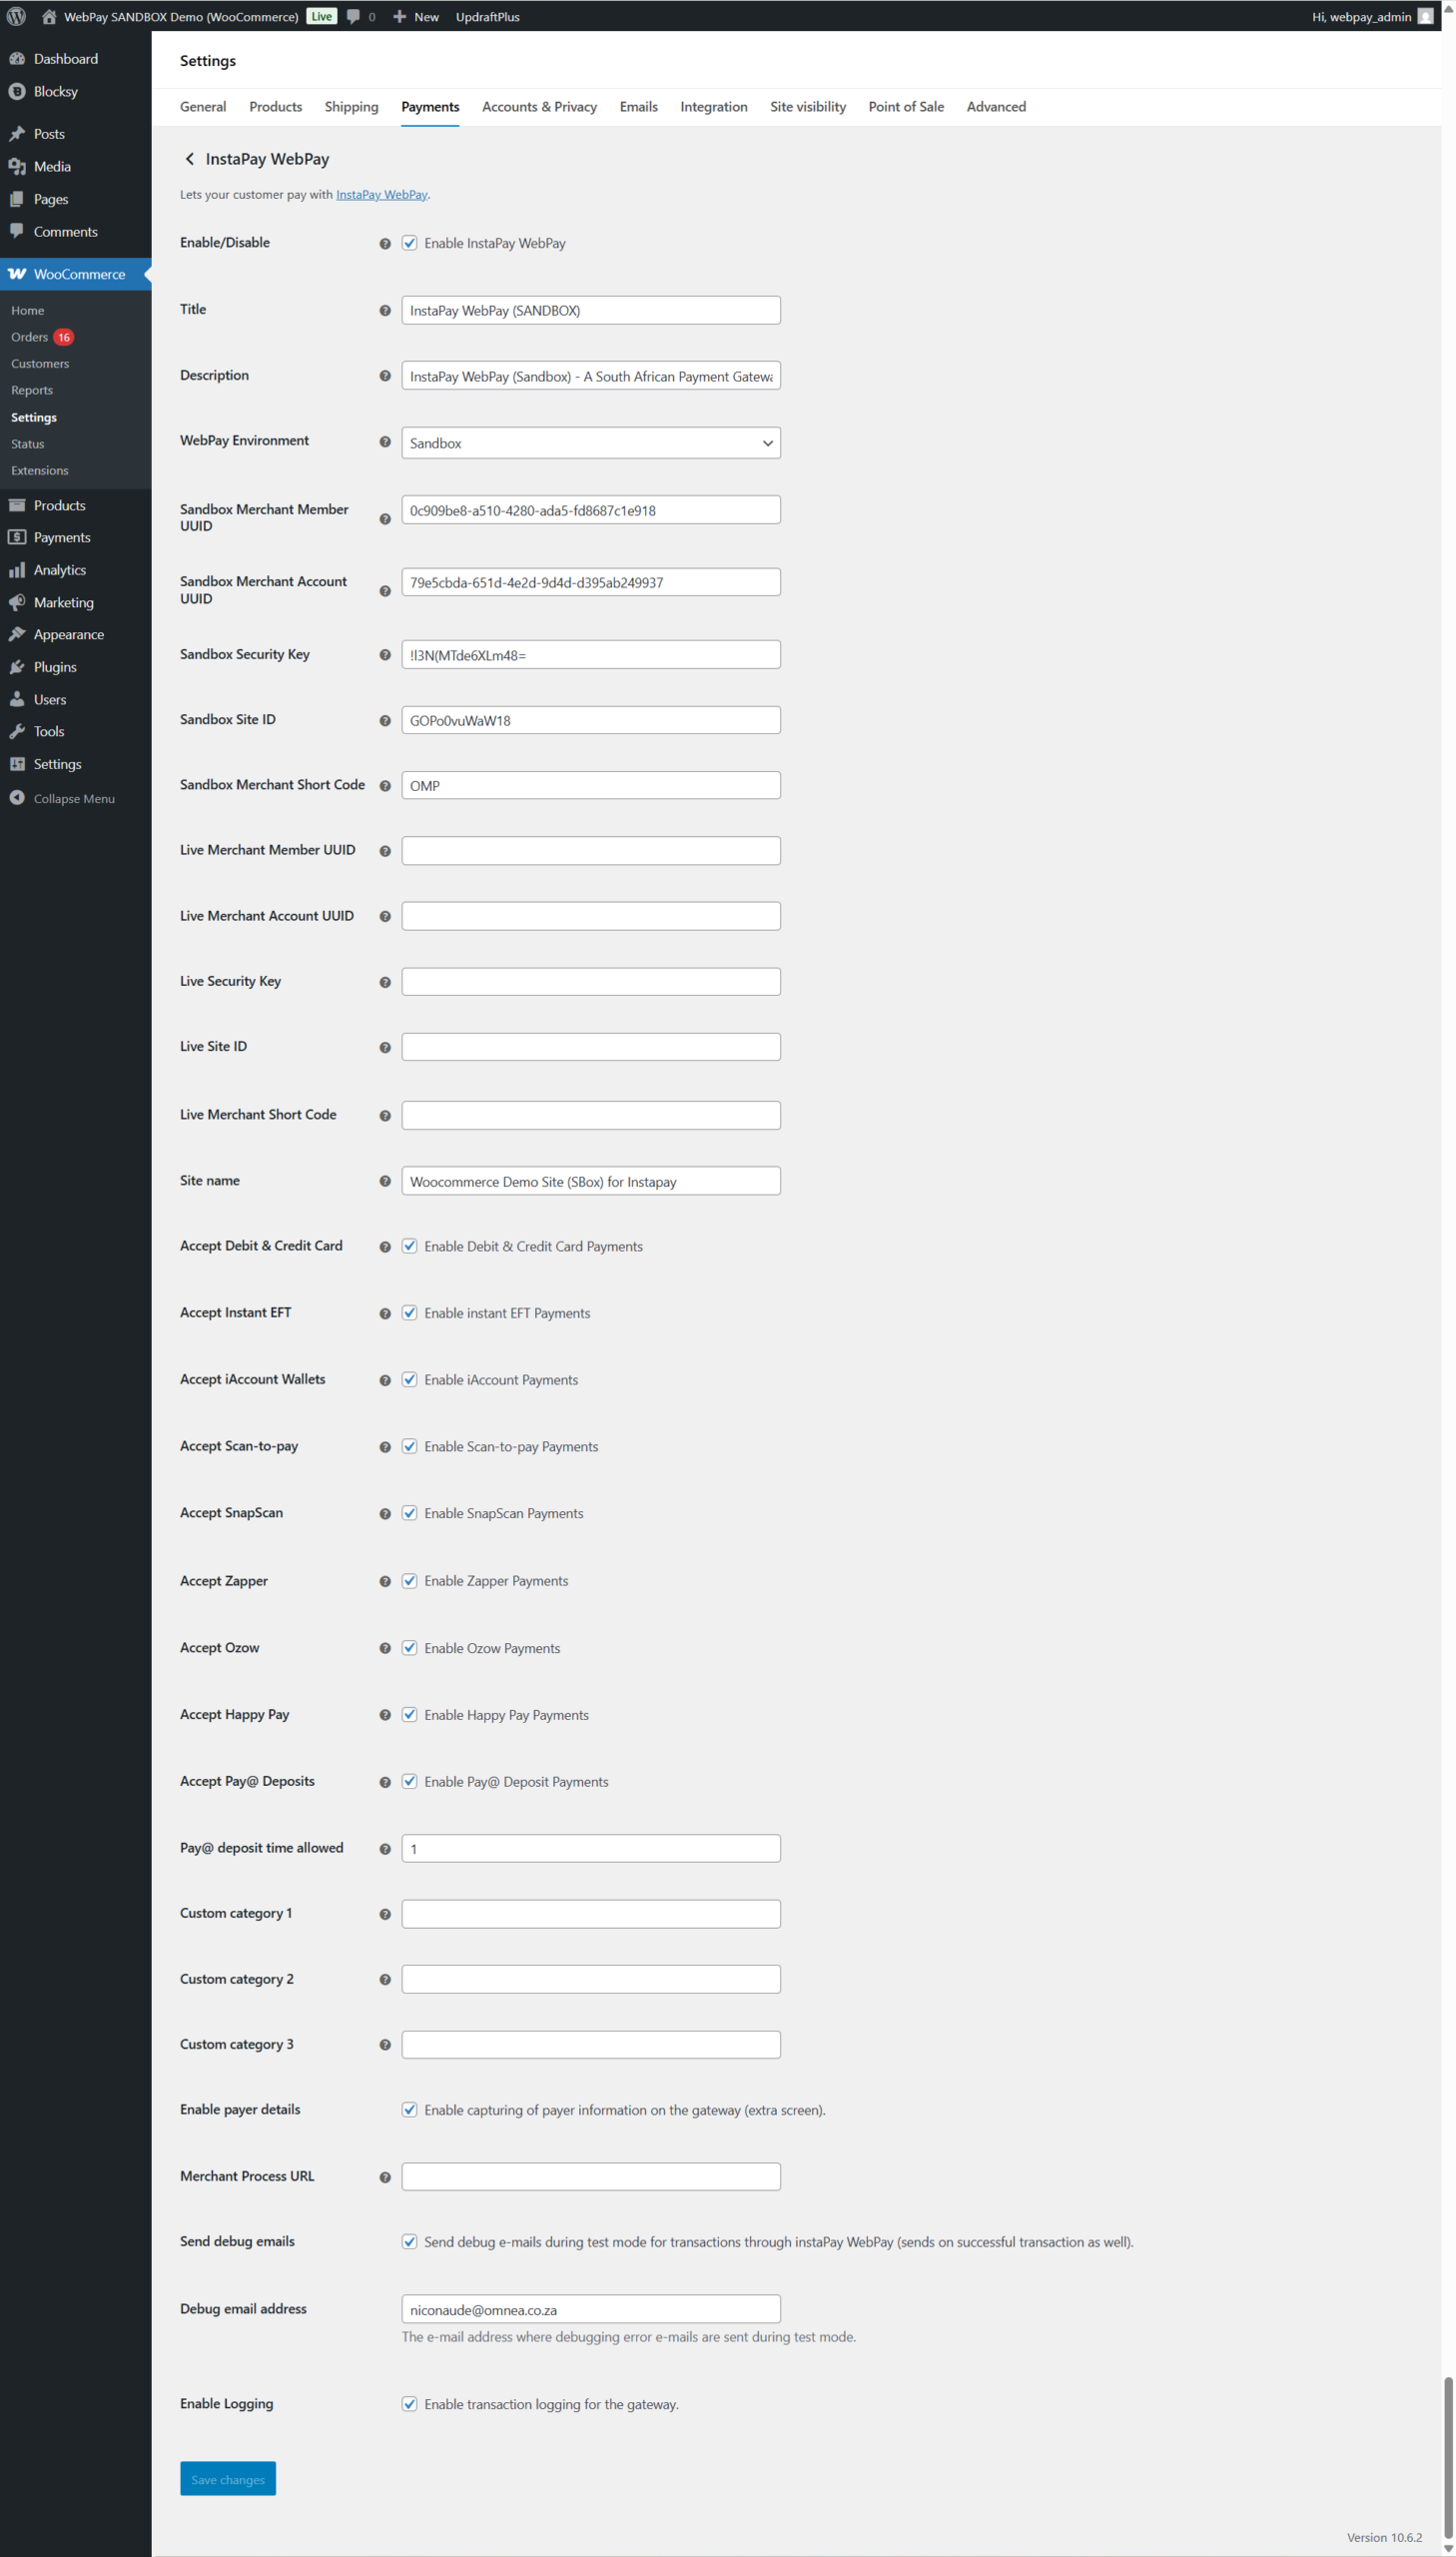
| Field name | Format | Required | Description |
|---|---|---|---|
|
Enable/Disable |
selector |
– |
A selector that allows the admin to enable/disable InstaPay WebPay. |
|
Title |
text box |
M |
A text field that allows the admin to enter a custom title for the payment gateway to be displayed on the check-out page. |
|
Description |
text box |
M |
A text field that allows the admin to enter a custom description for the payment gateway to be displayed on the check-out page. |
|
WebPay Environment |
selector |
M |
A selector that enables the admin to switch between Sandbox (test) mode and Live mode – when Sandbox mode is selected, the Sandbox account details must be provided, and if Live mode is selected, the Live account details must be provided. |
|
Sandbox | Live Merchant Member UUID |
text box |
M |
This is where the admin specifies the merchant’s identifier (36-character UUD) as provided under account settings on the InstaPay Money Manager portal. |
|
Sandbox | Live Merchant Account UUID |
text box |
M |
This is where the admin specifies the merchant’s account identifier (36-character UUD) as provided under account settings on the InstaPay Money Manager portal. |
|
Sandbox | Live Security Key |
text box |
M |
This is where the admin specifies the unique security key for the registered website as provided under WebPay section on the InstaPay Money Manager portal. |
|
Sandbox | Live Site ID |
text box |
M |
This is where the admin specifies the unique site ID for the registered website as provided under WebPay section on the InstaPay Money Manager portal. |
|
Sandbox | Live Short Code |
text box |
M |
This is where the admin enters the routing (short) code for the registered website as specified under the WebPay section on the InstaPay Money Manager portal. |
|
Site name |
text box |
O |
A text field that allows the admin to specify a custom value for the site name / location / subsystem where the transaction originated from. |
|
Accept Debit & Credit Card |
selector |
– |
A selector that allows the admin to specify if CREDIT & DEBIT CARD payments should be available as a payment option on InstaPay WebPay gateway. |
|
Accept instantEFT |
selector |
– |
A selector that allows the admin to specify if INSTANT EFT payments should be available as a payment option on InstaPay WebPay gateway. |
|
Accept iAccount Wallets |
selector |
– |
A selector that allows the admin to specify if iAccount (CHIPS, GarsiePay, etc.) payments should be available as a payment option on InstaPay WebPay gateway. |
|
Accept Scan-to-pay |
selector |
– |
A selector that allows the admin to specify if Scan-to-pay (previously Masterpass) payments should be available as a payment option on InstaPay WebPay gateway. |
|
Accept SnapScan |
selector |
– |
A selector that allows the admin to specify if SnapScan payments should be available as a payment option on InstaPay WebPay gateway. |
|
Accept Zapper |
selector |
– |
A selector that allows the admin to specify if Zapper payments should be available as a payment option on InstaPay WebPay gateway. |
|
Accept Ozow instantEFT |
selector |
– |
A selector that allows the admin to specify if Ozow Instant EFT payments should be available as a payment option on InstaPay WebPay gateway. |
|
Accept Happy Pay |
selector |
– |
A selector that allows the admin to specify if Happy Pay (Buy now pay later) payments should be available as a payment option on InstaPay WebPay gateway. |
|
Accept Pay@ Deposits |
selector |
– |
A selector that allows the admin to specify if deposit at Pay@ enrolled retailers should be available as a payment option on InstaPay WebPay gateway. |
|
Pay@ deposit time allowed |
text box |
– |
A text field that allows the admin to specify the number of days to be added to the current date to calculate the due date displauyed to the client. |
|
Custom category 1 |
text box |
O |
A text field (1) that allows the admin to specify a custom value that could be used for transaction categorisation or other purposes. |
|
Custom category 2 |
text box |
O |
A text field (2) that allows the admin to specify a custom value that could be used for transaction categorisation or other purposes. |
|
Custom category 3 |
text box |
O |
A text field (3) that allows the admin to specify a custom value that could be used for transaction categorisation or other purposes. |
|
Enable payer details |
selector |
– |
A selector that enables the admin to specify if the payer/buyer screen is displyed during the payment process on InstaPay WebPay gateway. |
|
Merchant Process URL |
text box |
O |
This is an optional field that must contain a valid webhook URL. If specified, this is where the system will send payment process status notifications (Find out more) |
|
Send debug email |
selector |
– |
A selector that allows the admin to specify if debug emails should be sent. If enabled, debug emails will also be sent for successful transactions. |
|
Debug email address |
text box |
O |
This is a conditional field, ans must be specified if the Send debug emails is set to ‘yes’. The admin must specify a valid email address where debug emails will be sent to. |
|
Enable Logging |
selector |
– |
A selector that alows the admin to enable/disable logging. If enabled, logged data can be viewed on the Logs tab under the WooCommerce>Status menu option. |